Git Etiquette for New Hires
Having worked with interns and new hires, one thing I wish programmers learned before taking a job is git – how to use it and, more importantly, how to use it well. After spending far too many hours explaining git and cleaning up another person’s git history, I’ve decided to write up a short-and-sweet guide. This post should teach the very basics of using git in a way that makes collaboration easy instead of painful.
What is version control?
Image you’re writing a novel, and you want to save a snapshot of what your book looks like every step of the way. This way you can say, “what all have I added in the last month?” or, “what did my book look like 6 months ago?” or “Undo the changes I made yesterday”. There are 2 ways to accomplish this:
- Every time you save, save an entire copy of the book
- Every time you save, only record the difference between the last save and the new one
The second method is the basis of version control. Instead of saving your book (or program, or thesis, or whatever) in its entirety, only save the diff of the save: what you’ve added and what you’ve removed since the last save.
Commit yourself
In version control lingo, a snapshot of your code is called a commit. This consists of a diff (the code you’ve changed) and a commit message. Suppose you’ve just fixed a bug in the file src/login/auth.c. You’ll commit that fix like this:
git add src/login/auth.c
git commit
Then, a text editor will open up for you to record a message for your commit. It’s easy to ignore the commit message, but it’s how your colleagues know what changes you’ve made and why you’ve made them. Consider the following two messages:
Fixes buffer overflow bug
Fixes buffer overflow bug

Adds length check to username copy
This adds a length check to the username input to prevent a buffer overflow as reported in bug #385
Clearly the second message is more informative. Unlike the first, it has a title that summarizes the fix, notes what input is being modified, why it’s been modified, and gives a bug number as reference. If a coworker is looking through old code or going through bug fixes, they can easily find this commit from the bug number or vice versa.
The second most important thing about commits is that you keep them atomic. This means one commit should accomplish exactly one thing. For example, think about a commit like this:
Fixes several bugs
This commit applies fixes for bugs #854, #855, and #862.
One of the reasons the diff-based version control is so powerful is the ability to roll back individual commits or cherry-pick commits from one branch to another (we’ll get to that a bit later). However, bunching up several changes into one commit makes these functions impossible. Additionally, it may not be clear which lines of code fix which bugs. Similar bug fixes in the future might be harder without a clear past example.
Branching out
The other major aspect of version control is branches. Think of these as “alternate timelines” for your code. In one branch, you might add an experimental feature. Another branch might have a fix for a bug. The reason these are useful is, once the feature is working or the bug is fixed, you can merge that branch into the “main” branch. So instead of cluttering your main branch with half-finished features and possible bug fixes that could break your program in the interim, sort those out in branches and then merge the changes in.
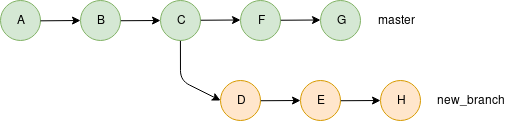
In this example, the master branch was on commit “C” when “new_branch” was created and commit “D” was added to it. Notice that work on the master branch doesn’t need to stop; you can switch back to master, make commits, then switch back to “new_branch” and make even more commits.
Additionally, it allows multiple people to work on the same code without interfering with each other by working on their own branches. To create a new branch, use the checkout command with the b flag:
git checkout -b new_branch_nameThe master branch
By default, all git repositories have a master branch. This is your default, working branch at any given moment. That is, you should be able to download the master branch and compile that code into a functional program at all times.
Release branches
This is something generally seen in large projects and professional settings. When a program is ready to be released to the public and be labelled as “version x.y”, a branch can be created for that version. This can make it easier for CI systems to build from the right commit or for consumers to build a specific version.
Merging branches
Once you think your bug is fixed or your feature is finished, you need to merge that branch into master or a release branch. This essentially takes all of the commits from your branch and adds them onto the end of the destination branch:

Pull it all together
When you’re ready to merge a branch into another, you signal this to your co-workers with a pull request. This is chance for others to review what changes you’ve made in a branch and for you to explain why those changes should be merged into master (or whatever other branch). Generally I try to have at least 2 other developers reviewing a pull request. If possible, include your direct supervisor and one other person who’s worked on that code before.
Before creating a pull request, you should make sure the two branches can be merged. The one problem with branches is, if two different commits try to edit the same lines of code, it’ll result in a merge conflict. Before you can merge the branches together, you’ll have to resolve that conflict in your branch. You can test this on your local machine before making a request on your company’s server:
git checkout branch_to_merge
git merge destination_branch
If there is a conflict, each one will be marked by git in the source file, and you’ll have to fix that conflict and re-add and re-commit those files before the merge can happen. A conflict in your code will look something like this:
<<<<<<< HEAD
/* This is code from the current branch */
int counter = 0;
=======
/* This is code from the destination branch */
int* counter = null;
>>>>>>> destination_branch
Once you’ve removed the code you don’t want to have and re-commited that file, use the continue flag to tell git to go through with the merge. If you decided you need more to make more changes, you can use the abort flag to back out of the merge.
git merge --continue
# OR…
git merge --abort
Re-base your efforts
Occasionally, it might happen that your branch takes a long time to finish. Remember, changes to master after your branch is made don’t apply to your branch. You’ll have to rebase your branch so it can include the new commits in master made after you branched off.
git rebase master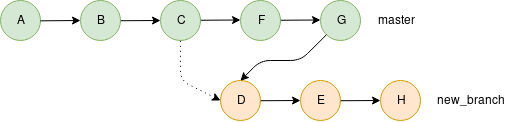
It’s also possible to rebase your branch onto an entirely different branch. Say your branch originally split off of master and you want it to branch off of a coworker’s “awesome_feature” branch instead. This is done with the same command:
git rebase awesome_featureLike merges, rebasing can cause conflicts that must be resolved before the rebase can be completed.
Conclusion
Git is one of the most powerful tools in a programmers toolbox, so learning to use it well is vital to being a strong employee. This post covers just the basics – there are many more functions and flags you can use to manipulate your commits and work with others more seamlessly. Becoming a git master is one of the best ways to be a valuable member of your team.